

Friday, April 29, 2011
Coming soon...
New name, new etsy shop and many new handmade, eco-friendly home décor items. More information coming soon!


Tuesday, April 26, 2011
Big Changes Coming!
I've been hard at work on new designs for my Etsy shop! I've also decided that with these new designs is going to come a whole new name, look, website and shop! I want the new branding to represent my modern approach to home décor. So in a few weeks I will be unveiling my new name and website, I'm pretty excited about it! I will be introducing environmentally friendly items into my shop, using organic materials and water based eco friendly inks, all handmade in my San Diego, CA studio. I can't wait to share it all with you! Stay tuned!
Thursday, April 21, 2011
Light Fixtures
The past couple of weeks we have been working on renovating our laundry room. Currently there is just a bare bulb for a ceiling light so I've been in search of a stylish period style light fixture that will look appropriate in our 1940 cottage. After a little searching around on the trusty internet I came across this fantastic website, Schoolhouse Electric! Not only is their website super cute, clean and easy to use, it's filled with some pretty great light fixtures! I have my eye on several of them because we need new light fixtures in just about every room as well as some new outdoor light fixtures. Here are just a few of my favorites:
For our laundry room and hallway I really like some of these classic styles:


Two of these would be really cute on the wall in our restroom, one on each side of the vanity mirror:

Here are a few others I really love:


For our laundry room and hallway I really like some of these classic styles:
Two of these would be really cute on the wall in our restroom, one on each side of the vanity mirror:
Here are a few others I really love:

How cool is this one below?


They also have a great selection of light bulbs including the classic Edison bulbs which have recently been gaining popularity once again.

Their website is filled with so many cute light fixtures that would work great in just about any period style home, barnyard style or even modern home! I think I will definetely be purchasing a few light fixtures from them but with so many great options the hard part is choosing which ones!
Wednesday, April 20, 2011
New exciting things coming!
So it's be awhile since my last post but it's not because I'm doing nothing it's actually quite the opposite! I'm in the process of getting all set up so I can start screenprinting and I have all sorts of new home accessory products coming to my Etsy shop! It's still going to be several more weeks before this happens but I'm very excited about it!
We have also been working on our laundry room makeover which I hope to have completed in the next couple of weeks so there will be photos up soon! It's about 75% complete, we just have some cabinets to paint, need to find a new light fixture and a few other things before it's completed. Since I don't want to post without a photo here is a photo of my red tubes pillow cover.

We have also been working on our laundry room makeover which I hope to have completed in the next couple of weeks so there will be photos up soon! It's about 75% complete, we just have some cabinets to paint, need to find a new light fixture and a few other things before it's completed. Since I don't want to post without a photo here is a photo of my red tubes pillow cover.

Saturday, March 26, 2011
Driveway Landscape Project
After many delays we have finally finished our driveway landscape project! Our driveway is very long and narrow. There is a narrow planting area that runs the length of our driveway and is the dividing line between our property and our neighbors. When we first purchased the house this area looked like this:


 We decide to reuse the bricks by creating a border on the edge of driveway which would widen it just enough that when passengers got out of the car it would be wide enough that they would no longer be stepping into the dirt. First we had to make a large trench by removing a lot of dirt and tamping it all down. We added this edging to prevent the bricks from moving around.


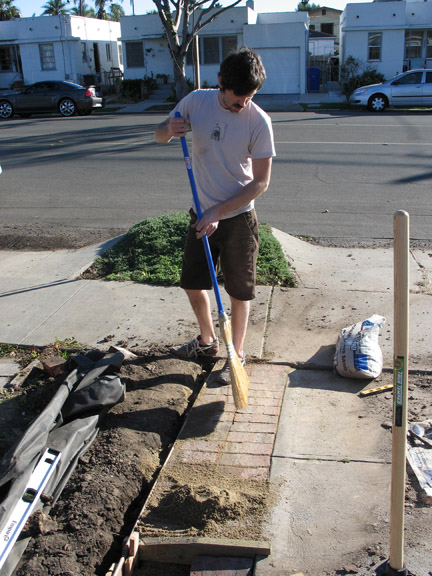


There were hedges running the length of our driveway. This photo was after we did a major trimming job on them, they were so overgrown and a huge mess. The white building behind them is our neighbors garage. The hedges were a great privacy barrier but they grew into the driveway, were always dropping piles of leaves in the driveway making a huge mess everyday and when the car was in the driveway you couldn't get into the passenger side because the hedges prevented you from opening the door. Also the way the bricks had been placed allowed weeds to constantly grow in between them and it was really difficult to pull them out. It just looked like a big mess all the time. So we decided to hire someone to come remove the hedges.
After the hedges were removed this area was even more sad looking for awhile. We pulled up all the bricks with plans to reuse them.
Next we laid down a weed barrier and then we added a gravel base on top and tamped that all down.
After the gravel base was laid down we poured a layer of sand on top and tamped that down. Next we started laying down the bricks and used a mallet to set them into the sand.
Once the bricks were laid we swept sand into the cracks which keeps the bricks from moving around. It's really solid, those bricks aren't going anywhere!
This is the final outcome. It was just the perfect amount of width we needed!
We continued this process all the way up to the garage. We are really happy with the result! I love the added detail of the brick edging.
Next was the fun part, planting! This area gets a lot of sun and it was really important to us that it didn't require a lot of watering. First we needed to address the privacy issue that removing the hedges caused.
When we removed the hedges it uncovered our neighbors garage window which looks almost right into our dining room window. We wanted to screen this window. First our neighbors painted their garage to match the rest of their house since they were never able to do that when the hedges were there. Once they completed the painting we constructed this wire trellis and planted White Star Jasmine which will grow along the wires and eventually cover the entire side of their garage including the window. We can't wait for it to start blooming, White Star Jasmine has the most wonderful scent!
I choose to fill in the rest of the area with a combination of pony tail grass and succulents, filling in the remaining area with a pretty rock mulch which will help maintain moisture in the soil, block out weeds and won't break down like wood mulch.
The Ponytail grass is really pretty when the wind blows it.
To the right is our neighbors driveway. They decided to lay brick down too and I think it looks great! Where the post is they plan on building a little fence to cover up their trash cans. I haven't planted much right behind it yet because I'm going to wait for them to finish this fence so the plants don't get trampled. Once they complete that project I will add a few more of the grass and succulents, right now it looks a little disconnected,
Next we plan on doing the same brick work on the other side of the driveway along with similar plantings. It was hard work but the result was worth it! Plus no more stepping in mud in my heels when I get out of the car:)
Sunday, March 6, 2011

Friday, March 4, 2011
Little Bird Pillow in Inside Out Magazine!
I want to thank Inside Out magazine for featuring my Little Bird pillow in their March/April 2011 issue along with several other fantastic pillows! I just love everything about this photo!
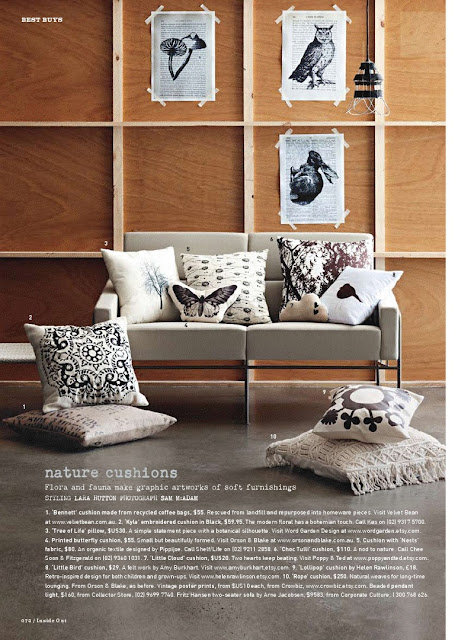


Get your Little Bird pillow at my etsy shop
Subscribe to:
Posts (Atom)